Clear Windows Update Cache อัปเดต Windows 11 ไม่ได้ ลบค่าเดิมการอัปเดตต่างๆใน Windows 10 และ Windows 11
สำหรับผู้ใช้งาน Windows 10 และ Windows 11 อาจเกิดปัญหาไม่สามารถอัปเดต Windows ได้อาจจะด้วยปัญหาหลายอย่างรวมกัน Cache ของการอัปเดตก็เป็นส่วนหนึ่งของปัญหาการอัปเดต Windows ไม่ได้ รวมไปถึงการเรียกคืนพื้นที่เก็บข้อมูลที่อาจตกค้างอยู่ในหน่วยความคำ Cache ของ Windows Update การ Clear Windows Update Cache จึงถือว่ามีประโยชน์ในด้านใดด้านหนึ่ง บทความนี้จะพูดถึงวิธีการล้างแคชของ Windows Update ในวิธีต่างๆ ให้ได้ทราบกัน
![]()
Windows Update Cache คืออะไร
แคช Windows Update คือข้อมูลที่ถูกเก็บไว้ในคอมพิวเตอร์ของเราเกี่ยวกับกิจกรรมการอัปเดตซอฟแวร์ต่างๆ รวมไปถึงไดร์เวอร์อัปเตดต่างๆ ให้สามารถเข้าถึงและใช้งานในครั้งต่อไปได้อย่างรวดเร็ว ในบางกรณี เมื่อเวลาผ่านไป แคชเหล่านี้อาจเก่าและเสียหายหรือก่อให้เกิดปัญหาการเรียกใช้งาน รวมไปถึงการสะสมแคชเป็นระยะเวลาหนึ่งอาจทำให้ไฟล์ขนาดใหญ่กินพื้นที่ อาจจำเป็นต้องล้างค่าแคชเหล่านี้ออก และไฟล์แคชเหล่านี้ไม่มีผลต่อการใช้งานรวมถึงข้อมูลหลักของคอมพิวเตอร์ของคุณ
วิธีลบ Windows Update Cache ผ่าน Windows Explorer วิธีที่ 1
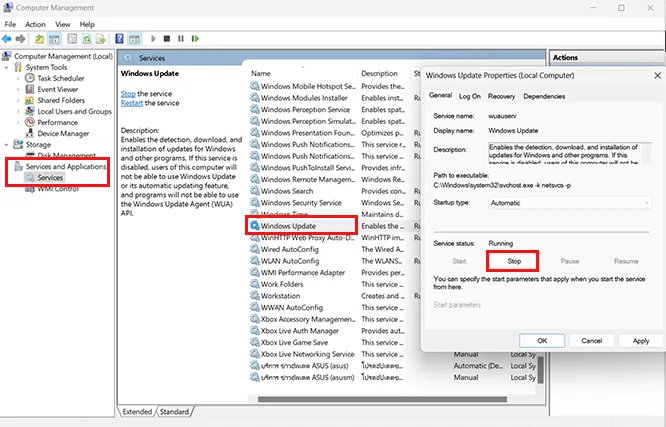
ให้ทำการปิด Service ของ โดยการกดปุ่มที่คีย์บอร์ด Win ![]() + R and และพิมพ์ services.msc กด Enter หรือคลิ๊กขวาที่ปุ่ม Start > Computer management > Services and Applications > Service
+ R and และพิมพ์ services.msc กด Enter หรือคลิ๊กขวาที่ปุ่ม Start > Computer management > Services and Applications > Service
มองหา Service ที่ชื่อว่า Windows Update ให้ดับเบิ้ลคลิ๊ก แล้วให้เลือก Stop เพื่อหยุดการทำงานของ Windows Update ชั่วคราว
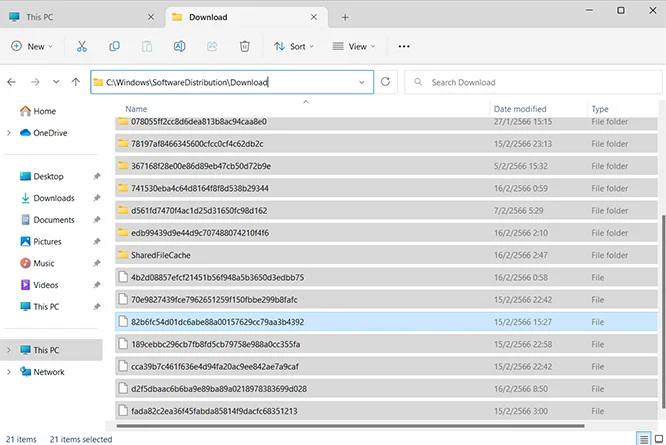
เมื่อหยุดการทำงานของ Service Windows Update แล้วให้ไปยังตำแหน่ง C:\Windows\SoftwareDistribution\Download ลบทุกอย่างที่อยู่ในโฟลเดอร์ดังกล่าว จะเป็นแคชทั้งหมดเกี่ยวกับ Windows Update
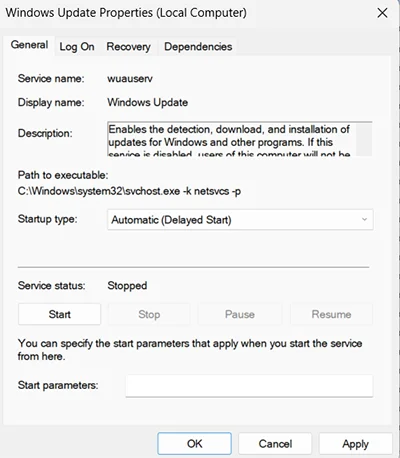
เมื่อลบทุกอย่างหมดแล้ว ให้กลับไปที่ Win ![]() + R and และพิมพ์ services.msc > Windows Update อีกครั้งและให้ทำการเปิด Start Service ให้กลับมาทำงานอีกครั้ง
+ R and และพิมพ์ services.msc > Windows Update อีกครั้งและให้ทำการเปิด Start Service ให้กลับมาทำงานอีกครั้ง
วิธีล้างแคช Windows Update ผ่าน Command Prompt วิธีที่ 2
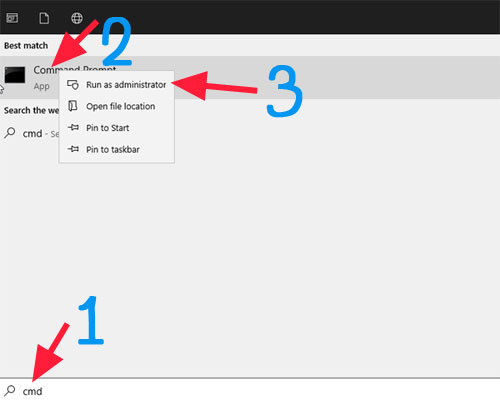
คลิ๊กขวาที่ปุ่ม Star > Search > พิมพ์ cmd คลิ๊กขวาที่ Command Prompt เลือก Run administrator
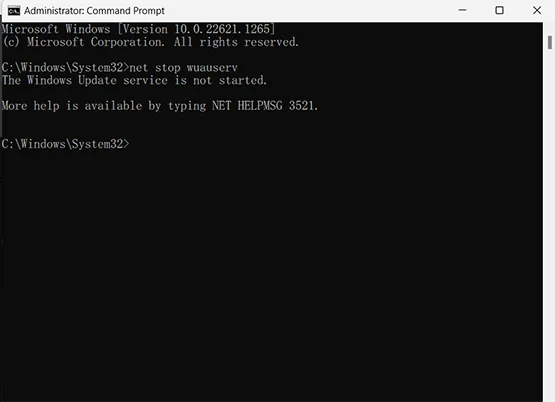
พิมพ์ net stop wuauserv เป็นการสั่งหยุดการทำงานของ Windows Update
จากนั้นให้พิมพ์
rd /s /q %systemroot%\SoftwareDistribution
วิธีการทำผ่าน Command Prompt นี้จะเหมือนกับลบด้วยมือด้วยวิธีแรก เลือกอย่างใดอย่างหนึ่ง
วิธี Reset Windows Update Components
คลิ๊กขวาที่ปุ่ม Star > Search > พิมพ์ cmd คลิ๊กขวาที่ Command Prompt เลือก Run administrator
ให้พิมพ์คำสั่งด้านล่างตามลำดับ
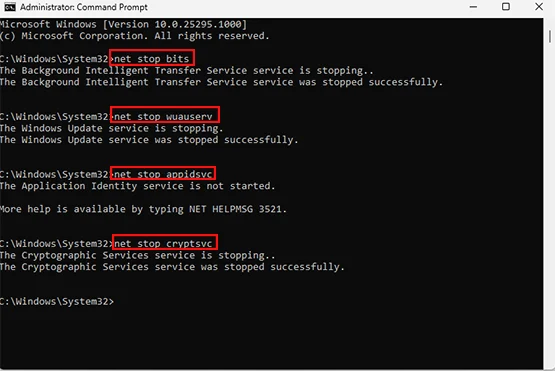
net stop bits
net stop wuauserv
net stop appidsvc
net stop cryptsvc
พิมพ์คำสั่ง
Del “%ALLUSERSPROFILE%\Application Data\Microsoft\Network\Downloader\qmgr*.dat”
Del “%ALLUSERSPROFILE%\Application Data\Microsoft\Network\Downloader\*.*”
เปลี่ยนชื่อโฟลเดอร์โดยพิมพ์คำสั่งเหล่านี้ลงไปทีละบรรทัด
- Ren %Systemroot%\SoftwareDistribution\DataStore DataStore.bak
- Ren %Systemroot%\SoftwareDistribution\Download Download.bak
- Ren %Systemroot%\System32\catroot2 catroot2.bak
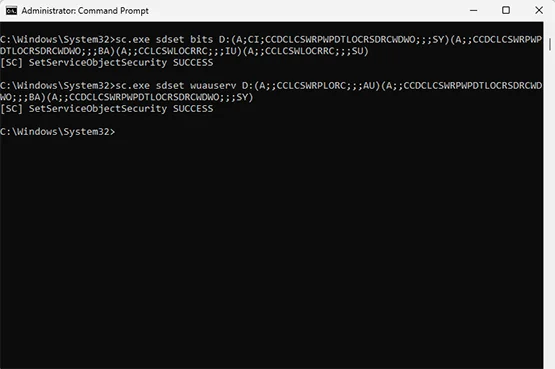
ทำการ Reset the BITS service และ Windows Update service ใช้คำสั่งเหล่านี้ลงไป
- sc.exe sdset bits D:(A;CI;CCDCLCSWRPWPDTLOCRSDRCWDWO;;;SY)(A;;CCDCLCSWRPWPDTLOCRSDRCWDWO;;;BA)(A;;CCLCSWLOCRRC;;;IU)(A;;CCLCSWLOCRRC;;;SU)
- sc.exe sdset wuauserv D:(A;;CCLCSWRPLORC;;;AU)(A;;CCDCLCSWRPWPDTLOCRSDRCWDWO;;;BA)(A;;CCDCLCSWRPWPDTLOCRSDRCWDWO;;;SY)
เข้าไปยังตำแหน่ง system32 โดยใช้คำสั่ง
cd /d %windir%\system32
ลงทะเบียนไฟล์ BITS และไฟล์ Windows Update โดยใช้คำสั่งเหล่านี้
regsvr32.exe atl.dll
regsvr32.exe urlmon.dll
regsvr32.exe mshtml.dll
regsvr32.exe shdocvw.dll
regsvr32.exe browseui.dll
regsvr32.exe jscript.dll
regsvr32.exe vbscript.dll
regsvr32.exe scrrun.dll
regsvr32.exe msxml.dll
regsvr32.exe msxml3.dll
regsvr32.exe msxml6.dll
regsvr32.exe actxprxy.dll
regsvr32.exe softpub.dll
regsvr32.exe wintrust.dll
regsvr32.exe dssenh.dll
regsvr32.exe rsaenh.dll
regsvr32.exe gpkcsp.dll
regsvr32.exe sccbase.dll
regsvr32.exe slbcsp.dll
regsvr32.exe cryptdlg.dll
regsvr32.exe oleaut32.dll
regsvr32.exe ole32.dll
regsvr32.exe shell32.dll
regsvr32.exe initpki.dll
regsvr32.exe wuapi.dll
regsvr32.exe wuaueng.dll
regsvr32.exe wuaueng1.dll
regsvr32.exe wucltui.dll
regsvr32.exe wups.dll
regsvr32.exe wups2.dll
regsvr32.exe wuweb.dll
regsvr32.exe qmgr.dll
regsvr32.exe qmgrprxy.dll
regsvr32.exe wucltux.dll
regsvr32.exe muweb.dll
regsvr32.exe wuwebv.dll

ทำการ reset winsock
netsh winsock reset
netsh winsock reset proxy
เปิดการทำงาน Service อีกครั้ง
net start bits
net start wuauserv
net start appidsvc
net start cryptsvc
หลังจากทำทุกอย่างหมดแล้วให้ทำการ restart คอมพิวเตอร์ของคุณ
Leave a Reply